Disassembling Lacie 5Big Nas Pro and adding a USB drive
Written 2021-11-26
Tags:NAS 5big Lacie
I picked up an older Lacie 5Big NAS Pro and decided to set it up as a ZFS server. I wanted to keep the data storage separate from the OS, so I opened it up to see if there was a way to add a USB or SATA-disk-on-module inside that wouldn't get bumped out or require one of the SATA drive slots. Turns out there is.
Remove Power
Remove Disks
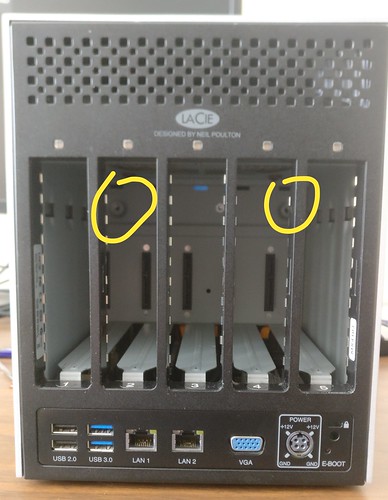
Remove these two screws
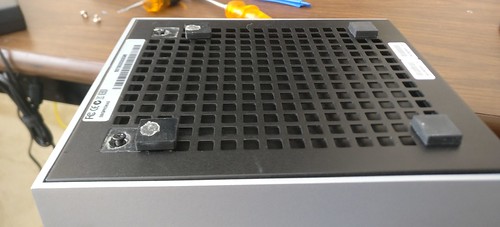
Flip upside down and remove two more screws from under front feet
You may wish to put down a towel or at least clean your work surface to prevent scratching the housing. These two front feet have screws under them and need removed.
Pry and slide the inner black sheet metal cube frame from inside the outer aluminum cube
Once both pairs of screws are removed, slide the internal black sheet metal housing back from the aluminum outer housing. It is a tight fit, so I used a pair of spudgers to start sliding it backward, and eventually used a flathead screwdriver - beware, metal tools may slightly mar the case, but do work much faster. Using the spudger or screwdriver as a lever, alternating pushing on each corner slightly.

Slide the motherboard holder out
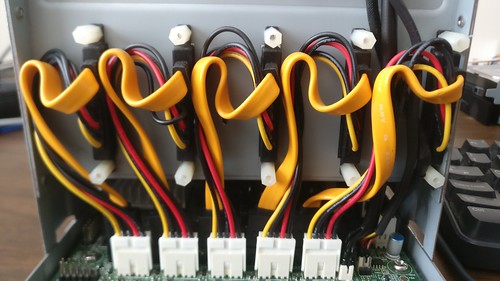
Pull the motherboard out a little, removing these three plugs(fan, lights, front I/O), then the disk power connectors, then the disk SATA connector. Note, the power and SATA connectors have retention clips, though the SATA connector clips are on the far side and not visible here. They need squeezed while pulling out the SATA plugs. Kind of a pull a little, unplug what you can, pull a little more, unplug a little more, rinse and repeat.
Motherboard upgrades and Maintenance
Power Button
Next to the front I/O connnector there is a pair of 0.1 inch header pins - these can be shorted together with a screwdriver to act as a power button press if needed.
RAM
My unit came with a single 4GB 1067MHz DDR3 SO-DIMM in slot2. Moving this SO-DIMM to slot 1 prevented the system from booting. Other 4GB DDR3 SO-DIMMs did work, but nothing worked in slot 1. This unit was listed with an Atom D2700, which has a single memory interface, though mine shows as a D2701 - the dual channel variant, but seems still limited to once channel. I did not attempt loading an 8GB SO-DIMM, as either way, the Atom D270x is limited to 4GB
CMOS Battery
Now is a good time to replace the CR2032 CMOS battery. I did mine carefully while powered to the BIOS so I would not have to adjust any settings.
USB Disk
There's a spare USB2.0 port next to the CR2032 battery holder. I installed a SanDisk 64GB Ultra Fit, though you could do a longer one, but not too long
BIOS Check
You can attach a VGA monitor, USB keyboard, power cable, then press delete at the BIOS screen to check the BIOS and make sure the USB disk is found. If desired, you may wish to go ahead and install an OS now just so you won't have to tear it all down if something doesn't work well, though the BIOS can be adjusted to select appropriate boot devices without reopening the case.
Reassembly
Reassembly is the reverse of disassembly, with the following important notes
Wire Replugging Count
As you slide the motherboard tray forward, you should reconnect a total of:- 5x SATA connectors
- 5x power connectors
- 1x front I/O connector
- 1x disk status light connector
- 1x fan connector
Disk Wire Guiding
The disk wires are partially coiled. As you slide the motherboard tray forward, make sure none of them catch on the white posts when sliding the motherboard tray in. I had to adjust the rightmost one on the way in.
Motherboard tray alignment
When sliding the tray in, it needs to be aligned correctly. Around 90 percent of the way reinstalled, mine stuck a little, and pushing on each corner and edge of the tray in turn got it to slide forward. It also did require a little more force than expected
Interior case screws
It's quite easy to drop a case screw into the unit. Placing the unit disk side up lessens the risk of dropping a screw into the motherboard area. A magnetic screwdriver might be helpful.
Case Screws
As you install the four case screws, at first, only go about halfway without tightening. This way the case has a little play internally, which is useful while lining up the rest, then go back and retighten.