Disassembly of Sherwood Wisdom 2 Dive Computer
Written 2024-04-21
Tags:MSP430 SCUBA
At the spring dive swap meet I picked up a broken Sherwood Wisdom 2 dive computer, just to take apart. I was mostly curious about the mechanical assembly.
A note to anyone considering repairing their dive computer: you should have a manufacturer-trained service center repair it. I bought this planning to destroy it. Here it is, roughly intact, minus compass assembly.

On to the disassembly. I started taking this apart before I photographed it, but I first noticed a small mark of RTV, likely a warranty-void indicator(this photo post cracking it open):

I first was able to lever out the front optical cover.
So, this bezel is important. There were a few slots around the edge of the bezel. In this photo, I have already gotten it mostly loose. I am uncertain how you would take this apart with less damage, likely with a custom tool. The retaining bar the bezel clips over is quite tall, and the bezel plastic brittle, perhaps from age? But anyways, I started at the top with a thin screwdriver, and some guitar picks and spudgers, and worked my way around:

Once that was out of the way, I could remove the gasket and the next layer of display plastic:

At this point, I foolishly pulled the electronics module out by flipping the assembly upside down. This dumped a handful of springs on to my desk, and they bounced away. These things are tiny. I found one in my leg hair. Here are those I was able to find:

Clusters of springs above:
- Top two short: these are for the UART data port. I'm missing one
- Left spring and clip: part of a button
- bottom/right: long, uncertain
- bottom/left-center, look like battery contact sized, but battery only needs two
- mid/right: mid-length, these connect to a flex that connects to the high-pressure port
Here is the rear of the circuit board:

And here is the front-side with the LCD unfolded to the left:
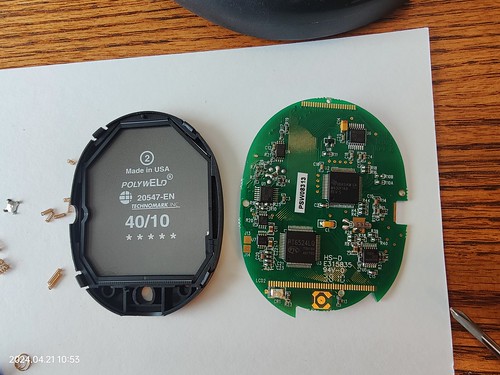
Here is the PCB, with better lighting:

Above the left side is mostly analogs for depth sensing. Big IC bottom middle is an LCD controller/driver. Big IC near center is a TI MSP430F148(48KB Flash, 2KB SRAM, 12-bit ADC, UART), with JTAG pins brought out to test points possibly for programming. Top right section is a RS232 line driver for the data port. Bottom right looks like an op-amp for the high-pressure port.